You just finished a grueling four-hour broadcast. You hit "Stop Streaming," open your channel to clip the best moments, and find it completely empty. The stream is gone.
Twitch does not save streams by default. It is a live stage, not a hard drive. To figure out how to save your live streams on Twitch, you must explicitly enable a specific setting in your dashboard. Even then, auto-saved VODs expire and vanish in 7 to 60 days. Protecting your content requires a strict workflow involving Twitch auto-save, local recording, and off-platform archiving.
How do I save my Twitch streams automatically?
Twitch does not save broadcasts by default. To save future streams, open your Creator Dashboard, go to Settings > Stream, and toggle on Store Past Broadcasts under the Video on Demand (VOD) Settings. Twitch will now automatically save your broadcasts for 7 to 60 days based on your account tier. For permanent storage, record locally using Open Broadcaster Software (OBS).
Why Your Twitch Stream Disappeared After Ending
Missing streams usually stem from disabled settings, expired retention windows, or mobile platform bugs.
VOD Saving Was Off
If the "Store Past Broadcasts" toggle was off the moment you clicked "Start Streaming", the broadcast never saved. Twitch cannot retroactively recover a stream.
The Retention Window Expired
If you passed your 7, 14, or 60-day limit, Twitch deleted the VOD automatically.
Special Formats Expired Early
As noted above, vertical and 2K video files face a strict 7-day deletion cycle regardless of your account tier.
The HTTP 410 Gone Error
If you click an old VOD link and see an "HTTP 410 Gone" error message, the server is confirming permanent deletion. Stop refreshing the page. The file no longer exists.
Console Settings Failed
PlayStation and Xbox dashboards frequently fail to apply VOD setting changes. If you enabled auto-save on a console but the stream vanished anyway, the internal API likely failed. Always verify your settings on a desktop browser.
How to Save Your Live Streams on Twitch Automatically
Saving your broadcasts starts with a single dashboard setting. This setting only applies to future streams. You cannot save a stream retroactively.
Does Twitch Save Streams by Default?
No. Twitch operates strictly as a live broadcasting network by default. Turning on the "Store Past Broadcasts" setting commands the servers to create a temporary Video on Demand (VOD) file for your future streams.
Turn On “Store Past Broadcasts”
To establish a reliable Twitch VOD saving guide 2026 baseline, configure your dashboard first. Follow this path once:
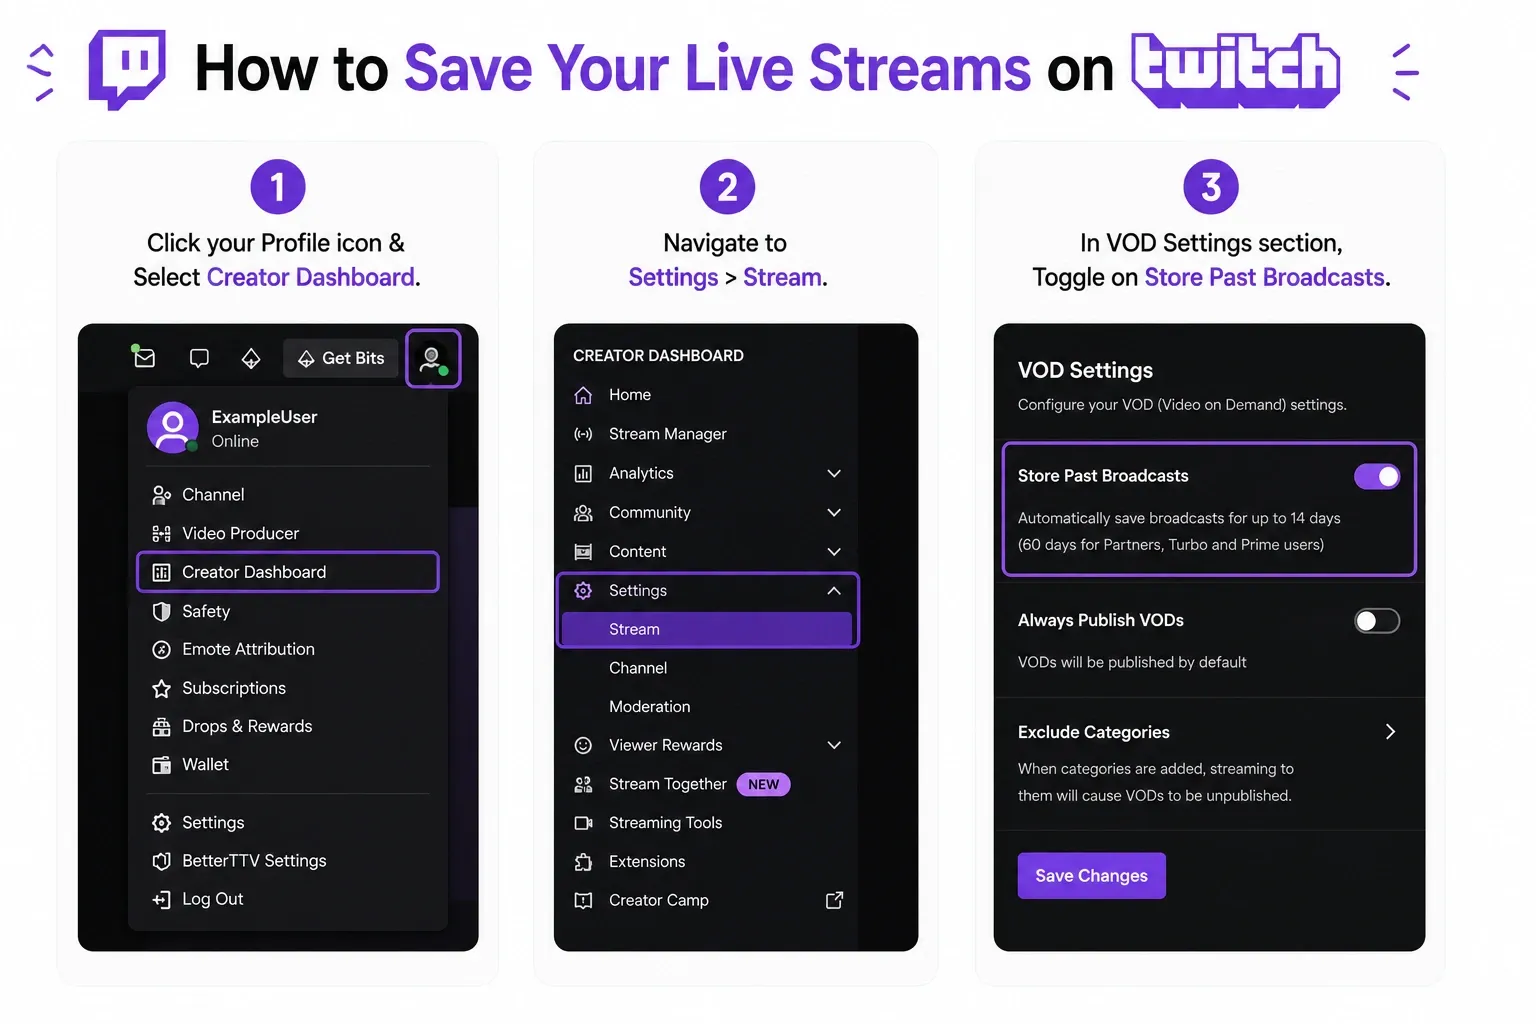
- Click your Profile icon in the top right corner.
- Select Creator Dashboard.
- Navigate to Settings > Stream.
- Scroll down to the VOD Settings section.
- Toggle on Store Past Broadcasts.
Twitch will now save streams automatically moving forward.
Manage VOD Publishing Visibility
Right below the auto-save toggle, you will find an option to always publish VODs. Auto-publishing works perfectly for most beginners. Keep your VODs unpublished by default if you frequently test new layouts, run private mic checks, or stream controversial content. You can manually publish them from the Video Producer later.
Avoid Mobile App Admin Settings
The Twitch mobile app and console interfaces consistently fail to display VOD settings accurately. Manage your channel configurations using a desktop browser. If you only have a smartphone, open your mobile browser, go to the Twitch website, and request the desktop site version to access the true Creator Dashboard.
How to Download Twitch Streams After Streaming
You can download your processed VOD directly from Twitch, but the native file is compressed and highly vulnerable to missing audio.
Find Your VOD in the Video Producer
When your stream ends, the platform moves the saved file to the Video Producer tab inside your Creator Dashboard. This location holds all your temporary past broadcasts.
Download the Native Video File
To download Twitch streams natively:
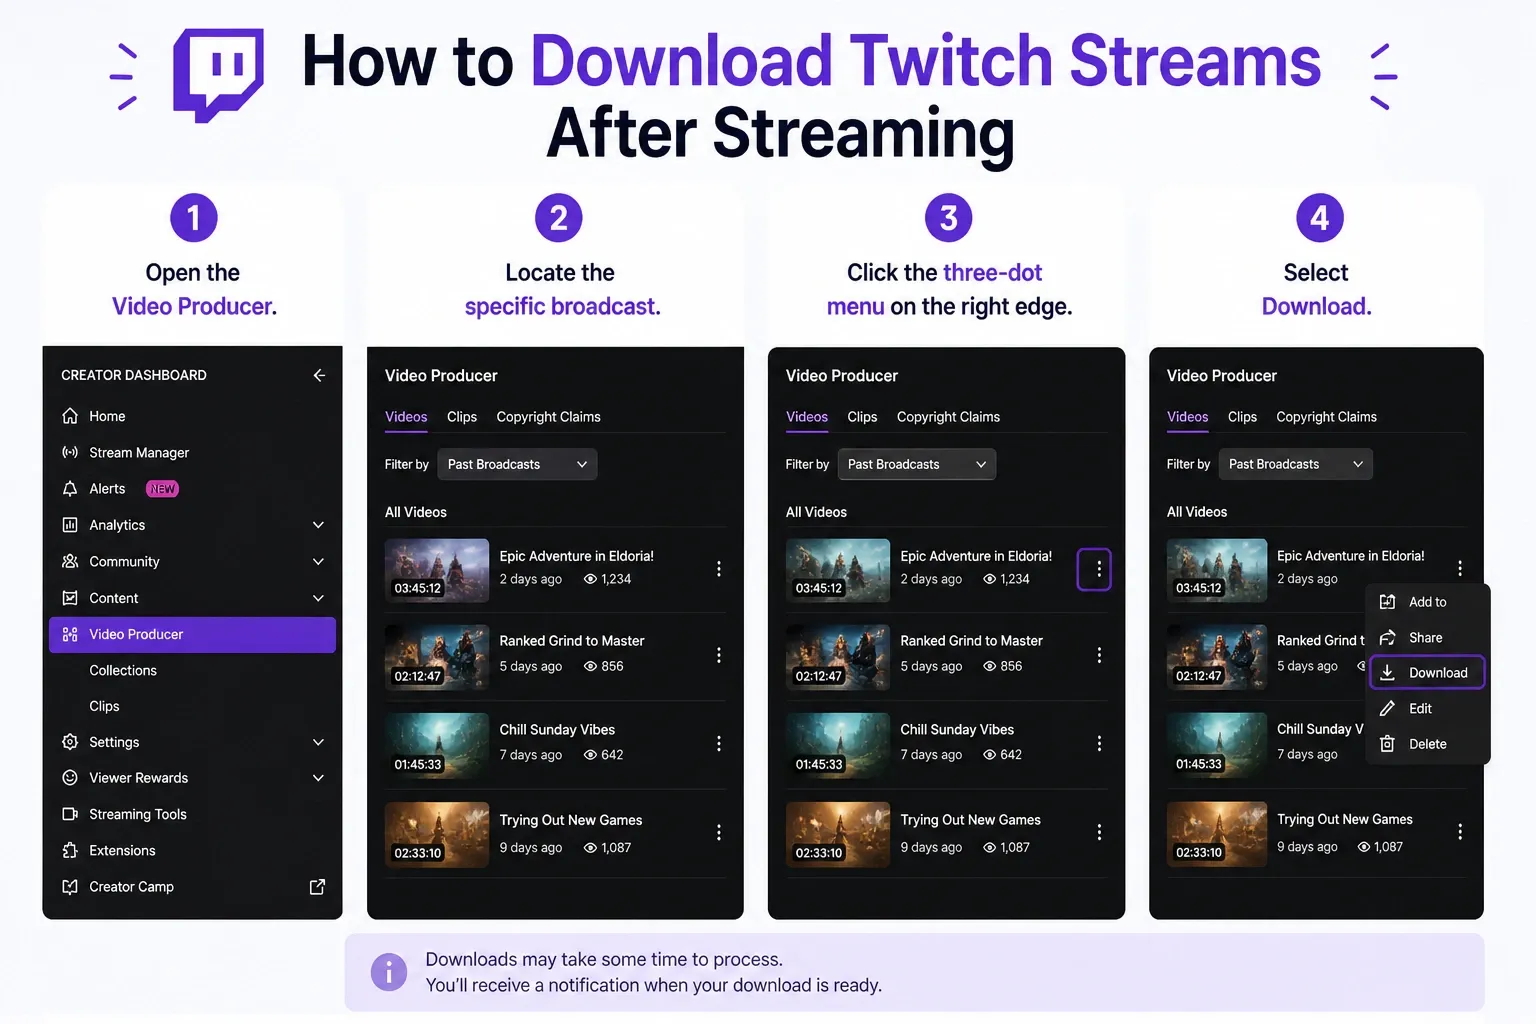
- Open the Video Producer.
- Locate the specific broadcast.
- Click the three-dot menu on the right edge.
- Select Download.
Twitch will prepare the video package and save it to your local machine.
Native Downloads vs. Local Recording
A native download works fine for a quick backup or grabbing a short, low-fidelity clip. However, it is not a master file. The platform heavily compresses the video. It also runs an automated scanner that mutes your audio if it detects copyrighted music.
If you edit gaming videos for YouTube or create high-quality vertical shorts, you need a local OBS recording instead.
Best Way to Save Twitch Streams (3-Layer Backup Strategy for Creators)
Treating Twitch as a permanent hard drive will result in lost content. Serious creators use a three-layer preservation strategy.
I view a Twitch VOD as a convenient backup. Relying entirely on cloud infrastructure optimized for live delivery carries high risk. The safest workflow is the 3-layer system.
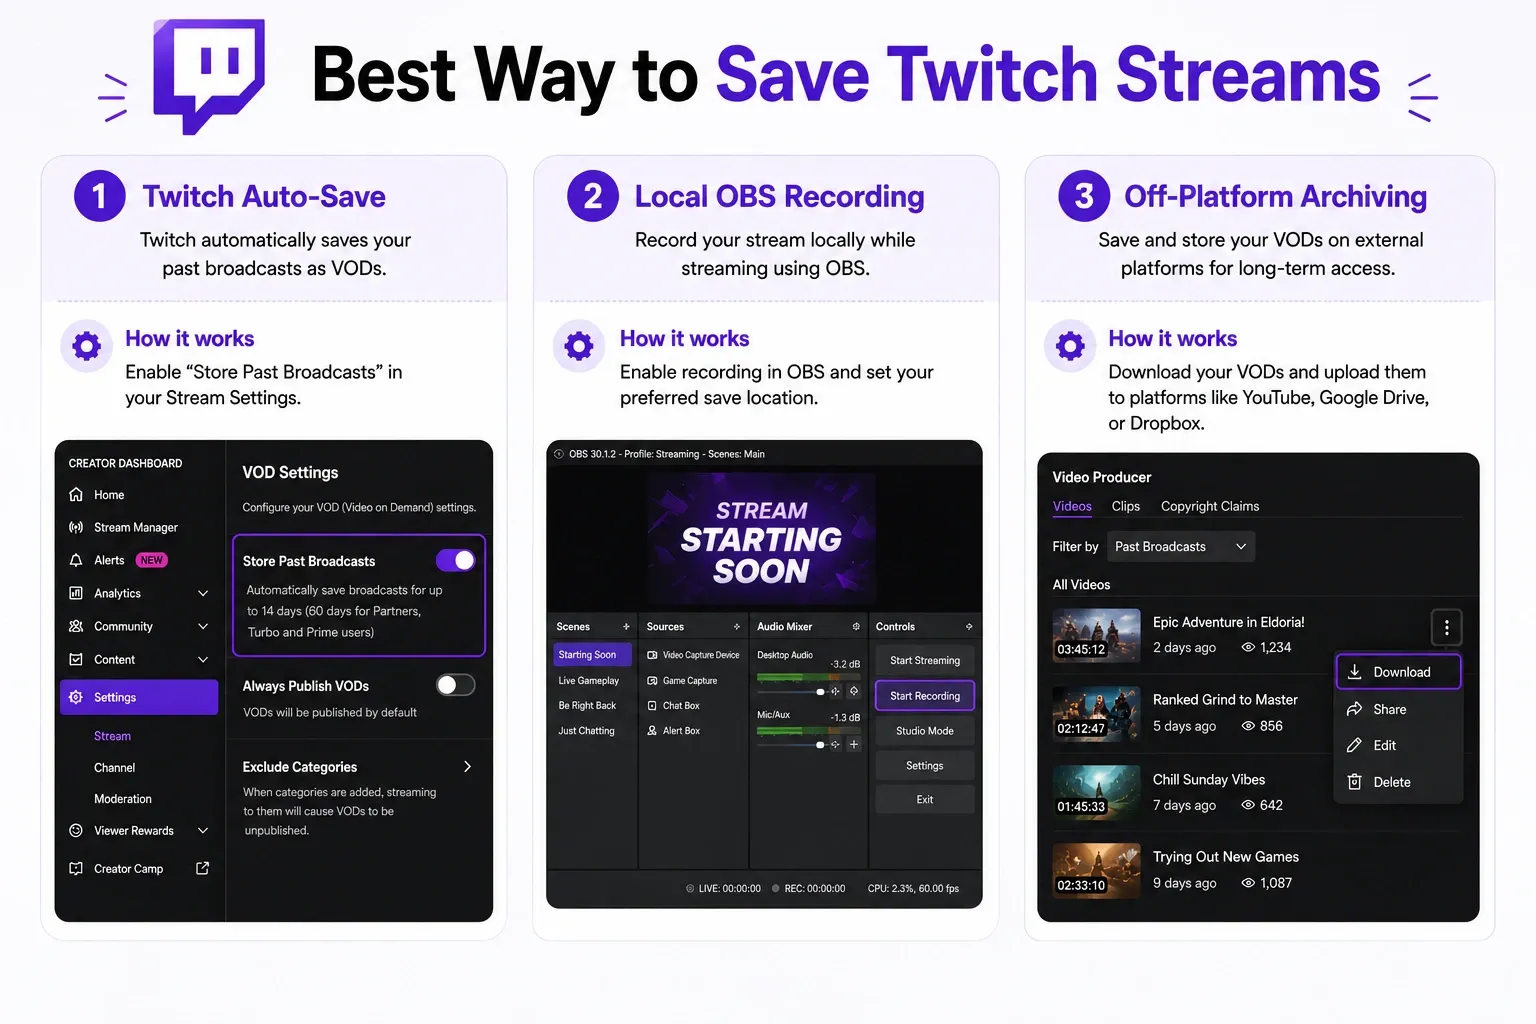
Layer 1: Twitch Auto-Save
Enable the native Twitch auto-save setting. This layer provides immediate replay access for your audience and lets you pull quick native downloads. It also protects viewers who want to maintain their Watch Streaks.
Layer 2: Local Open Broadcaster Software (OBS) Recording
Record your broadcast locally via OBS Studio while you stream. This serves as your ultimate safety net. A local recording captures a pristine master file with no compression artifacts. It has no expiration date and requires zero download time.
Layer 3: Off-Platform Archiving
Twitch servers aggressively purge old files. Move your important streams to YouTube, a Network Attached Storage (NAS) device, or a cold external hard drive before your Twitch retention deadline hits.
How Long Do Twitch Streams Stay Saved?
Twitch deletes VODs much faster than new streamers realize. Your retention window depends on your specific account tier.
VOD Retention by Account Type
Twitch does not save broadcasts by default. To save future streams, open your Creator Dashboard, go to Settings > Stream, and toggle on Store Past Broadcasts under the Video on Demand (VOD) Settings. Twitch will automatically save your broadcasts for 7, 14, or up to 60 days depending on your account tier. For permanent storage, either convert streams into Highlights or record locally using Open Broadcaster Software (OBS).
Your retention limit is strictly enforced based on your channel tier:
- Standard accounts (Non-Affiliate): 7 days
- Affiliate accounts: 14 days
- Partner, Prime, and Turbo accounts: 60 days
Always double-check your current tier, as platform policies occasionally shift.
Vertical and 2K VODs Expire Faster
High-bandwidth broadcast formats face accelerated deletion. If you stream in 2K or dual-format vertical layouts, those specific VOD variants expire in just 7 days. This rule applies even if you hold Partner status.
The 100-Hour Storage Limit on Highlights
Older advice claims you can convert a VOD into a Highlight to bypass deletion and save it forever. That method is dead. Twitch now enforces a strict 100-hour combined storage limit for Highlights and Uploads. Do not treat the platform as an infinite archival space. Use Highlights selectively for highly engaging moments.
Prevent Muted Audio in Saved Twitch VODs
Muted VODs happen due to copyright strikes or poor audio routing. Fix this in OBS before you go live.
Why Streams Save With Missing Audio
You download your VOD and discover thirty minutes of absolute silence. This happens because Twitch detected copyrighted music and muted the segment, or you routed your OBS audio tracks incorrectly.
Route the OBS Twitch VOD Track
OBS Studio includes a dedicated "Twitch VOD Track" feature. This setting allows you to separate your live audio from the audio that saves to your VOD. You can play music for your live viewers while sending a clean, music-free mix straight to your saved Twitch file.
In your OBS Advanced Audio Properties:
- Microphone: Routed to Live + VOD
- Game Audio: Routed to Live + VOD
- Desktop Music: Routed to Live ONLY
Run a quick two-minute private stream to test this routing. Finding out your audio is broken on a short test is much better than ruining a four-hour master file.
Which Twitch VOD Tools Are Still Worth Using?
Rely on native Twitch tools or your local OBS recordings first. Use third-party downloaders only for bulk actions.
For downloading your own broadcasts, the native Twitch Video Producer provides the safest and most secure path. If you need a master file, rely on your local OBS recording.
If you must bulk-download public VODs, stick to actively maintained open-source forks on GitHub. Avoid older software like Twitch Leecher. The original application is abandoned and frequently generates SSL errors due to outdated API calls. Always check a tool's last update date before trusting it with your channel archive.
How to Watch Twitch Streams Without Ads
Reviewing your own content or analyzing competitor streams is frustrating when dynamic ads break the video player. Use a targeted blocker and choose the best ad blocker for Twitch for your browser.
If you edit long streams for YouTube repurposing, unskippable mid-roll ads waste your time.
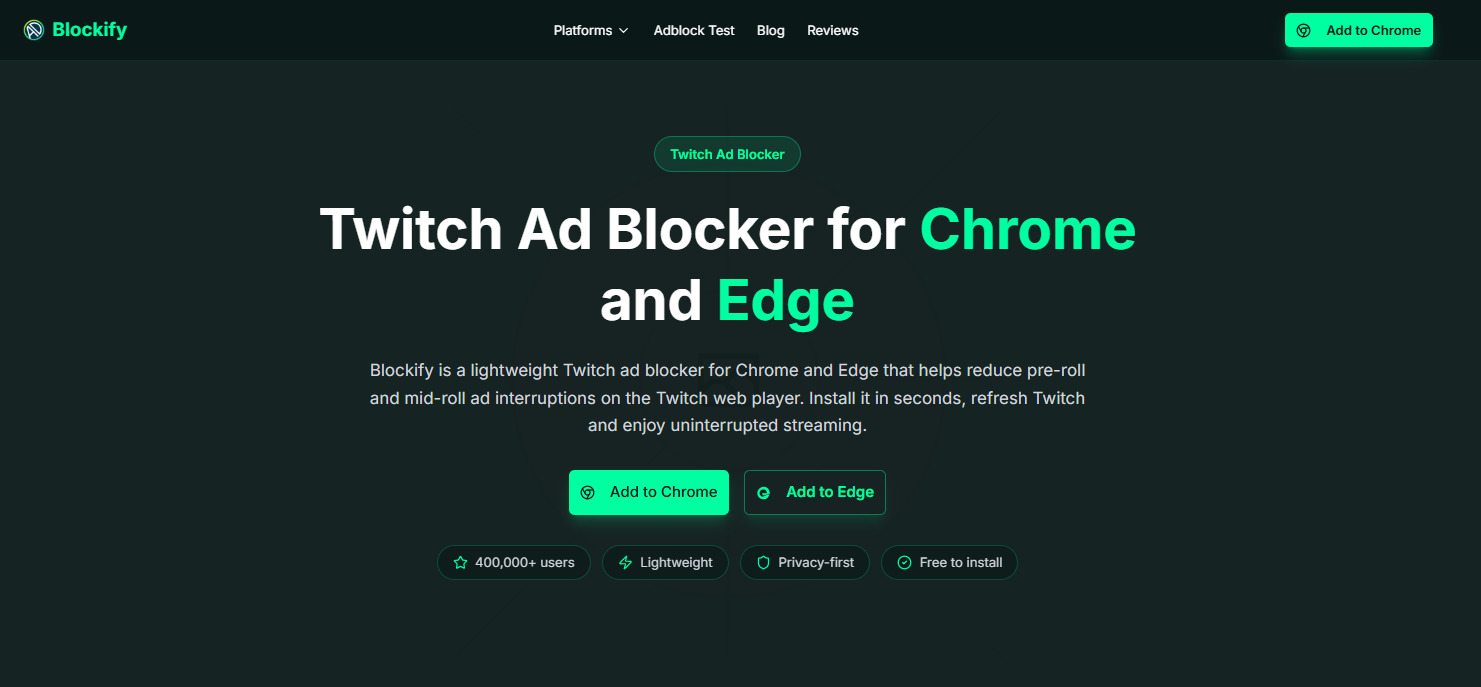
Blockify
Blockify handles dynamic streaming ads seamlessly using a dual-layer blocking system and intelligent audio muting. With over 300,000 users and a 4.8 rating from 5K ratings on the Chrome Web Store, it acts as a highly reliable, set-and-forget tool. It targets content-heavy platforms specifically where traditional blockers struggle.
uBlock Origin
This is a standard, lightweight, and open-source option. It works well but occasionally requires you to manually update filter lists when streaming platforms change their ad injection code.
AdGuard
AdGuard offers robust system-wide protection. However, you generally need the premium desktop application version to consistently block dynamic ads on heavy streaming sites.
FAQs
Does Twitch Save Your Streams by Default?
No. You must navigate to your Creator Dashboard and manually enable the "Store Past Broadcasts" setting to save future streams automatically.
How Do I Save My Twitch Streams Automatically?
Go to your Profile icon, click Creator Dashboard, select Settings, and click Stream. Scroll to VOD Settings and toggle on "Store Past Broadcasts".
How to Download Twitch Streams After Streaming?
Open the Video Producer in your Creator Dashboard. Find your past broadcast, click the three-dot menu on the far right, and click Download.
Can I Recover a Twitch Stream That Was Not Saved?
No. If VOD saving was disabled during the live session, the broadcast is permanently lost. Twitch does not store secret backup copies.
Are Twitch Highlights Still Permanent?
No. Twitch enforces a combined 100-hour storage limit for Highlights and Uploads. They no longer serve as an infinite archival tool.
Why Is My Saved VOD Missing Audio?
Your VOD lacks audio because Twitch muted a segment due to copyrighted music, or you routed your OBS Twitch VOD Track incorrectly.